At the start of this project we was told that we had to make a certain path choice either design or art...i chose art because it consists of all the things i want to do.
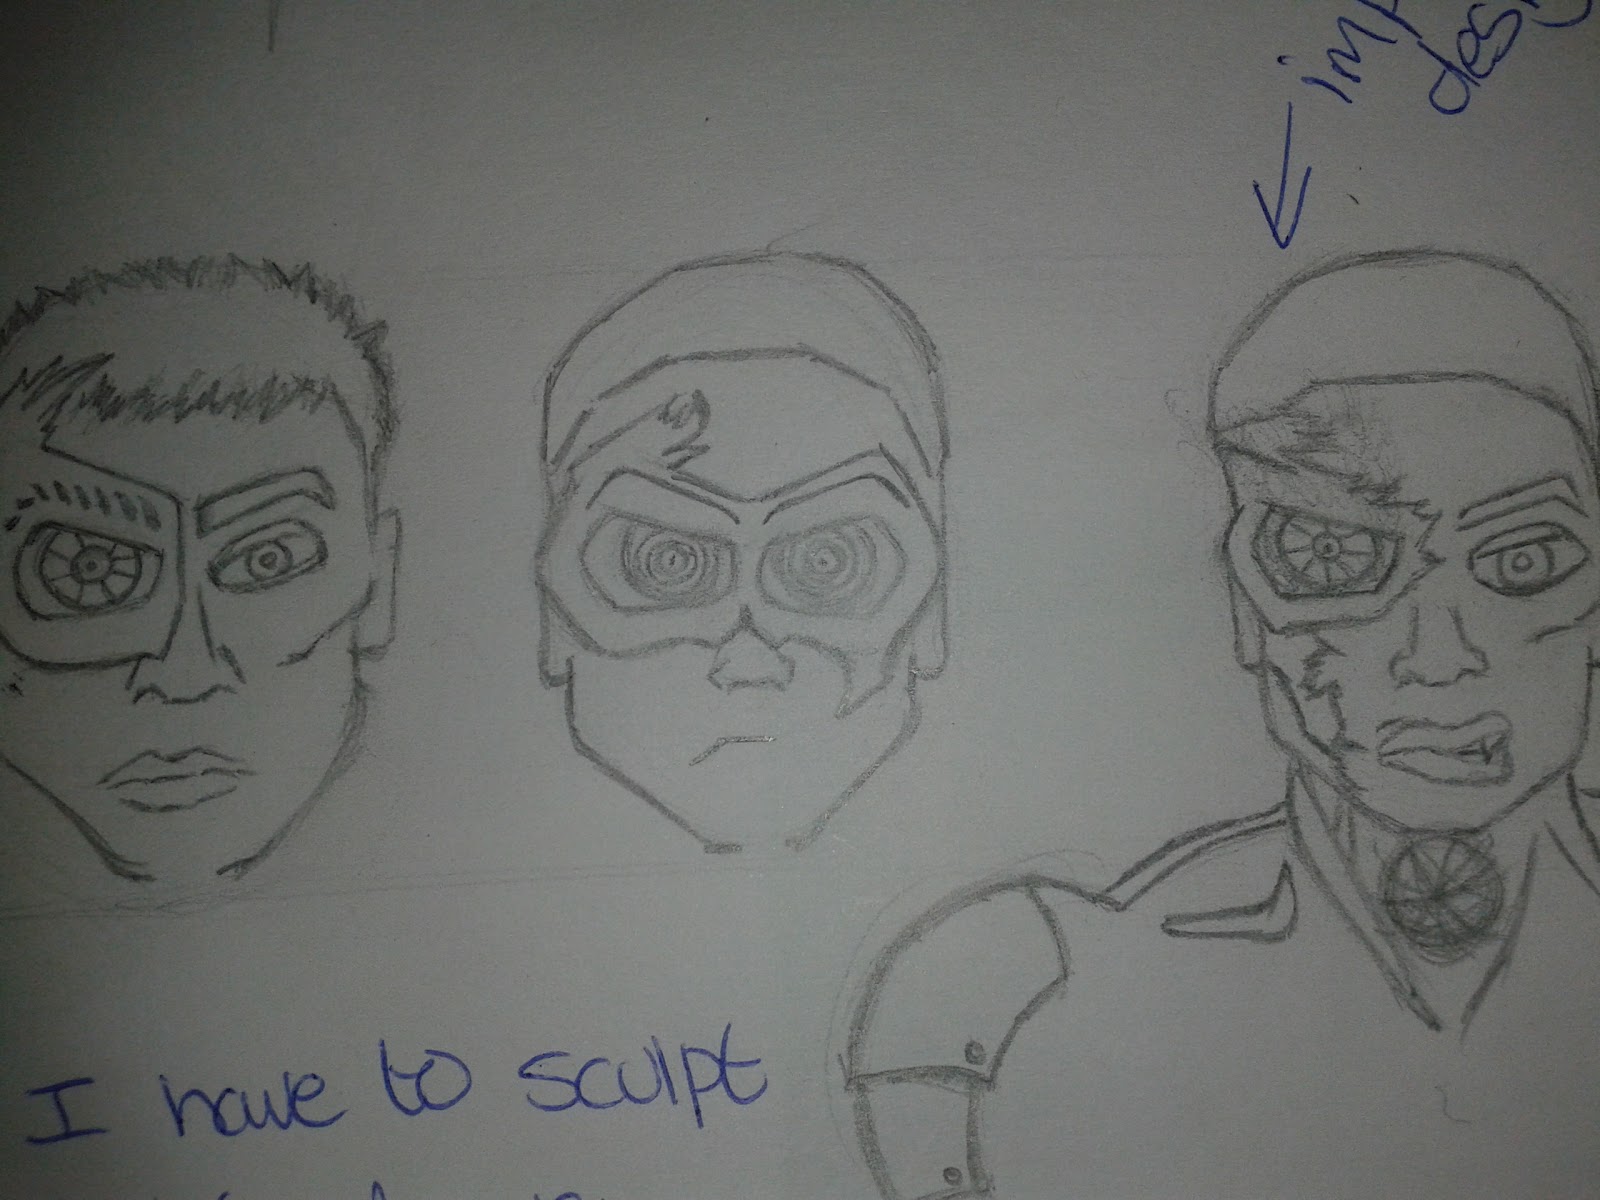
So as we had the first real lesson of the project on Monday 1st October we was introduced to our first sculpting project in Zbrush...we was told that we would be sculpting the bust of our characters we created in the last 3week project, but because we didn't have a lot of detail on the bust of our characters before to properly sculpt a really good bust we had to draw the bust out in further detail. My character had a lot of detail on the body however the bust only consist of the head and midway chest area this meant that when i only drew the bust my character looked like an ordinary guy so i had to improve my characters face to make him more unique...this took more research on robot imagery because my character if part robot and i needed people to be able to look at my bust i created and realise that straight away. So i drew a couple different ideas for busts then decided which one i wanted and drew a final one.

The next day in lesson on Tuesday 2nd October i showed my final to my tutor Simon and he told me the face was good however the chest and shoulders lacked in detail so i had to go back and improve that some more and add further detail. I also looked at how the muscles in the human necks are the looked at the robot in Terminator to see how I could change them into robot links and discovered that the usually use hydraulics and suspensions like they would in a car to make the joints link up and so the robot could move around like a human would and become as human like as possible, so i Incorporated that into my character as well.


Then on Thursday 4th October i was introduced into Zbrush by our tutor Simon, he showed us how to get Zbrush started and then he ran us through how to create a bust however he went a lot further then we would have being this is most of our first times using Zbrush, he showed us how to get started and then took us step by step through Zbrush and showed us what the different brushes do and also showed us some useful shortcuts to save time. That alone took a lot of time out of the day, then when we was allowed to start up Zbrush my wakon tablet wasn't working because of the cable so i had to wait for my other tutor Drew to get me a new one and when he finally got me one i got started and had a play around on Zbrush trying to get use to it however it was hard to use and get use to and will take a lot of practise to get use to it but i feel within time i will get use to it and my bust should look like what i want it to.
Friday 5th October i still didn't get to use Zbrush to start sculpting because there is something wrong with my account however my tutor Drew has reported it and hopefully on Monday 8th October i should be able to use it. So instead of sculpting on Friday i decided to work on my character...i started drawing up his new robot arm this time however i thought about how i could make it more realistic so the arm could function properly like a actual human arm and that took me the whole lesson because i had to think about what objects i could put in the joints so the arm could move freely like a actual human arm and how it would move up and down or around without something preventing that from happening. To be able to do this i looked at actual robot arm such as from the hit film the Terminator and i looked at the human arm muscles and how they all stuck together and i looked at the joints and compared them to the robot version and tried to Incorporate that into my robot arm.


Then i started designing my arm and this is what i came up with...when i finished the technical part of the arm i drew up some armour for the arm and added it on to the arm at the end.
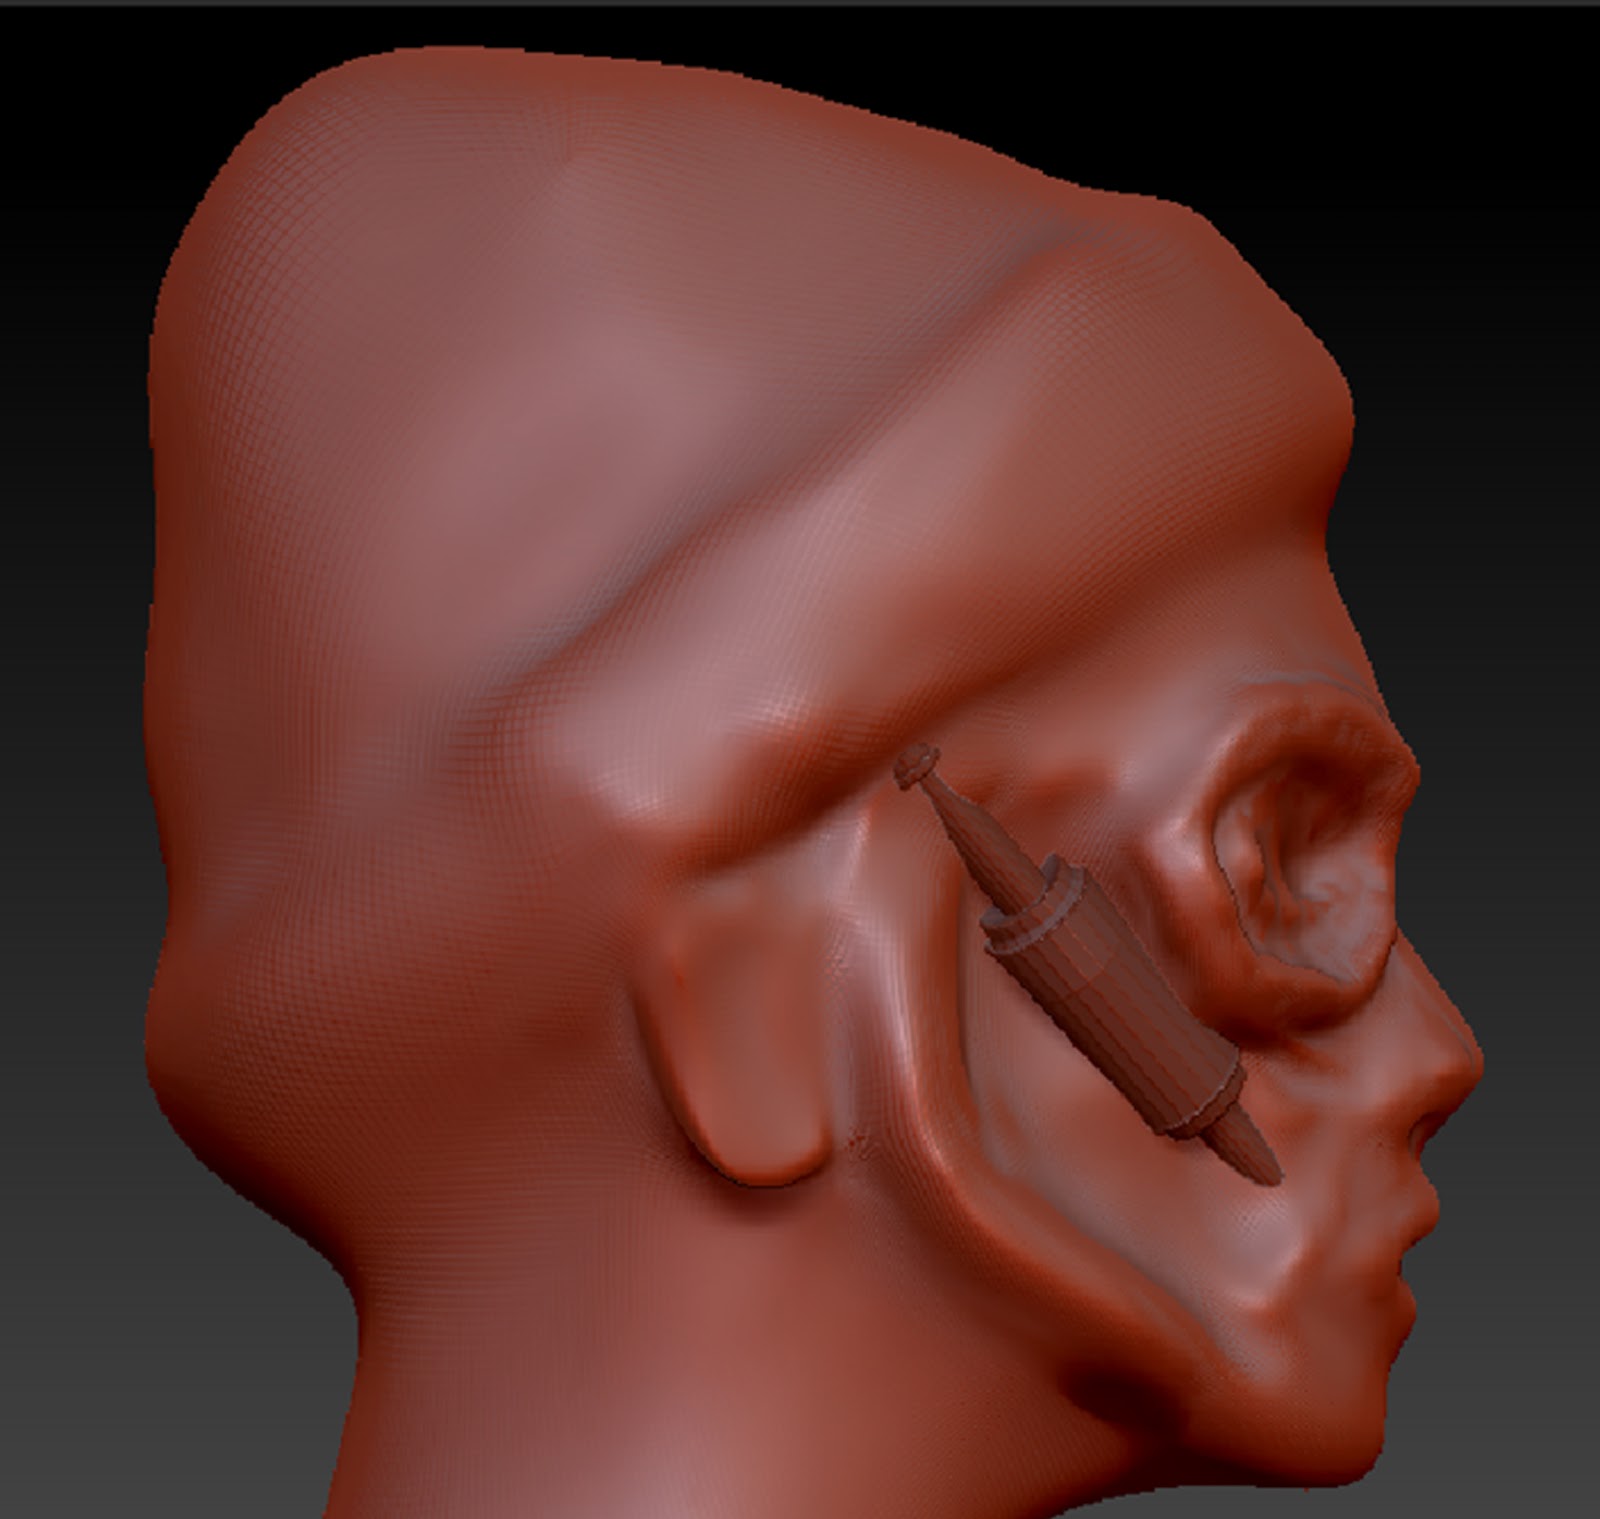
On Monday 8th October I started sculpting in Zbrush and started creating my bust for my character online, this took me some time to do however i was determined and carried on with it. Then i needed to create a hydraulic in the computer programme Maya to add it into my character on Zbrush because it was it was more effective to make it in Maya and it would be imported as a sub tool in Zbrush. However to import it into Zbrush i had to make the file into a .OBJ file otherwise it would not of worked in Zbrush and would've been a waste of my time creating...As i go along in this project sculpting through Zbrush i will have to sculpt a lot more separate things through Maya for my character because it will be more effective and more useful and will look a lot better overall at the end of my character.

This is the hydraulic i created in Maya then imported into Zbrush this took me a lot of time and effort to create however i am extremely happy with the outcome of it because everyone will no what it is just by looking at it which is what i wanted to do.
Tuesday the 9th October was a full on Zbrush day at college and because i saved my last Zbrush sculpture i did on Monday i had to re-do it again however because i am slowly getting use to Zbrush i did it faster this time with less problems.
Thursday 11th October we started physically sculpting our busts with clay unlike our last project which we sculpted using this product called green stuff this time where using something different, to be honest i prefer the new clay we are using to sculpt however it is very specific and hard to do but with some more practise i feel as if at the end of it i can accomplish something great. We sculpted throughout this lesson however i didn't finish my sculpture in time.

On Friday 12th October i just continued to work on my Zbrush model because i feel that is the hardest thing i have to do and i wanna get that done and out of the way with so i can then continue on my other models like my physical sculpting which is also going to be extremely hard to do however i do have fun creating it. In Zbrush i am still on the face of the character because there is a lot of detail i need to add because my character isn't a normal character he is half robot and to sculpt all the robotic mechanisms takes a lot of time to do and a lot of effort.

Monday 15th October i been working on my Zbrush sculpture and adding more detail to the face as i go along I'm getting more and more use to it as i go along however I'm still unsure about certain things and how to do them like making something in Maya and exporting it onto Zbrush...Today i have specifically been working on the jaw because it is a very prissies jaw my first attempt went wrong but took a lot of time so i got Simon to show me a better way to make a jaw and he did and so my second attempt was a lot better and definitely payed of taking time to make.
Because my characters eye is a robot one i also started working on that in Maya and came up with a design that i quite like however it will not be the final it is just the start of it. This is how i started of creating my eye from a simple cube that i just dragged and stretched into a rectangular shape.
On Tuesday 16th October i continued working on my characters eye because it is a very important object for my character because it is one of the things that tell you my character is part robot, so i continued working on it by making it more detailed and modifying it to make it look more unique, special and futuristic in its own way. Tuesdays lesson is not a long one so this took me all lesson trying to perfect the way the eye looks but i eventually finished the eye and now it looks like what i was aiming for if not better.
I also gave it a surface to be based on in replace of a eyeball so that way i could add it to my characters face without it looking awkward and out of place.
Thursday 18th October i have taken the eye out of Maya and placed it into my Zbrush sculpture and placed it on my character the way i wanted it to look and have also been fixing up in perfections because i have almost finished creating the bust and am soon enough going to need to move on to the body. As i am going to need to start sculpting my characters body now as well i need to add another cube with more faces to mold from because i could not make the body just from the faces i have left of the bust because there is no where near enough to support the detail i need so i have added another cube and will start sculpting of it soon as i can.
At first i will sculpt the body detail and add on his clothes after so it will all be in good proportion and look as professional as i can possibly make it.
On Friday 19th October i started sculpting my characters body however i didn't have much references for bodies so i started looking for some good reference photos to try work of but it took long trying to find the right kind of picture but i did in the end. I also had to draw my characters body up again because i had forgot to do that and needed it because i couldn't sculpt with knowing what the body is going to need to look like so i draw it up in my sketch book that has all my projects work in then i started sculpting for the rest of the lesson. I started of first by drawing the my characters body build in my sketch book and then i places his clothes on top of that by doing this the clothes are in better proportion and over all looks better.
On Monday 29th October and Tuesday 30th October i was digitally sculpting my characters body however i needed more reference so i went on google and got some pictures of a body builders body to work of.
I already had reference for a bulletproof vest so i didn't need to find that, once i found the body picture i started sculpting my characters in Zbrush, and that took me one and a half lessons to do, however i still have some imperfections i need to fix on my characters body.
At this point i realised from my body reference image that the abs didn't look realistic enough so i molded over the abs i created and re-did them so they look better and more realistic to a actual humans abs and i added my body shape form to my character as well so he hasn't just got a flat shapeless body.
This is my finished body for my character...the main flaw i see is that his waist is way to small for his upper body shape so I'm going to continue making his bulletproof vest in Maya and then when I'm done with that and import it into Zbrush i will fix his waist size.
This is as far as i have got down to today Thursday 1st November, all i have got to do now is create to straps on either sides of the vest as support to keeping it on him and making it more realistic and then importing it back into Zbrush.
Friday 2nd November i finally created the straps to my characters vest so i finished the creation stage in Maya and imported it into Zbrush for further improvements. Once i did import the bulletproof vest i divided the polygons some more the make it look more realistic and so i could give it some more detail so it could look the way i wanted it to.
Once i Had finished with the vest i started on making my characters arms and to do this i would of had to go back into Maya and create the basic form and sculpt of that because i could just grabbed and stretched the polly's from my characters shoulders however if i did this it would've effected how much detail i can add the the arm and wouldn't look half as good as it could.
I could only do one arm in the end because my other arm is meant to be a robot arm so i had to do one arm at a time and i chose to do the normal arm first because it would take a lot less time to do because the robot arm has a lot more detail and would of had to be made in Maya first then imported and then added to my character which s why i chose to do the normal arm to end my lesson with.
Monday 5th November i started creating my low res model in Zbrush because i have to start it before the project ends and i only have 3 lessons left. It isn't hard to do however it is very time consuming and I'm having problems trying to save it to my usb and that is a major problem and is wasting useful time i could be using in a positive way however i cant because i need to save my low res model as i go along because i have almost completed my characters face and MUST save it.I can also see a preview of how my low res is looking as i go along by pressing (preview) on the side menu.
Tuesday 6th November I just continued with creating my low res model in Zbrush and i kept looking at my preview model and in certain places there was gapes in the sculpture so i had to keep adding more lines into it to fix out the gaps and create a good low res sculpture.